
If your website load faster than higher the chance to get good position in search engine results. Today many factors work for good search engine ranking, one is CDN (Content Delivery Network). This technique highly recommended to speed up your website, even google officially declare that if your webpage load faster, than more chance to get higher search engine ranking.
CDN is technique which increase website speed along with the save server bandwidth. CDN network distribute some files from your server to other server. So when your webpage open, main data like HTML codes will be served by original hosting server and other files like images will be served by CDN server. Using this CDN network you can speed up your website performance.
Most recommended CDN network is CloudFlare, it has free plan also. If your website is in starting stage, prefer to CloudFlare network. If your websie have more tha 30k visitors per month than go for CloudFlare premium plan or another CDN network like MaxCDN.
Steps to Integrate CDN Network on Website
Their is two way to integrate CloudFlare CDN network on your website. One is using Cpanel and other is Manual Setup. Lets check it out.
Check This Also:
How to Auto Generate Image/Icons for iOS and Android Applications
How to Create a Repository at GitHub and Clone It into your Local PC
How to Convert a Website or Blog Into a Mobile App
CDN Integration using cPanel:
Some hosting providers like Bluehost and Hostgator provide CloudFlare CDN feature in cPanel. You can install it just by one click. See
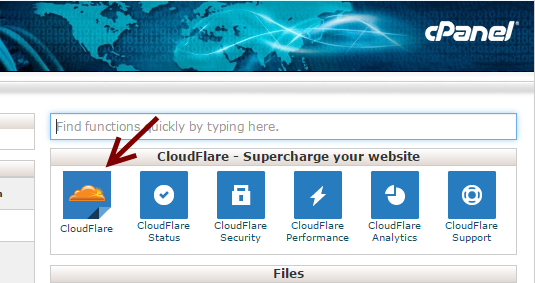
Click on CloudFlare symbol under advanced section in cPanel. Choose your website domain and click on gray color cloud icon to activate CDN. By doing this it will automatically update your DNS on your behalf.

Configure CloudFlare CDN Manually:
If your hosting provider does not provide inbuilt feature to integrate CDN network, than use this way to get it on your website. Personally this is recommended way.
1) Sign up in CloudFlare Account.
2) After login, click on Add Site option.
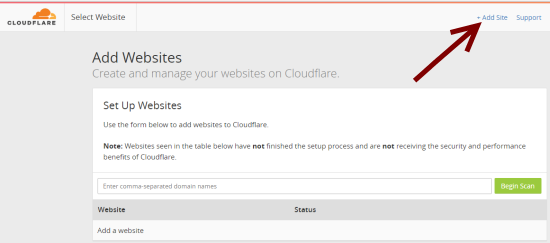
3) Put your domain name and click on scan button. CloudFlare will scan your domain records, after complete scan process you will redirect to DNS zone section, where you can check that all records successfully transferred or not.
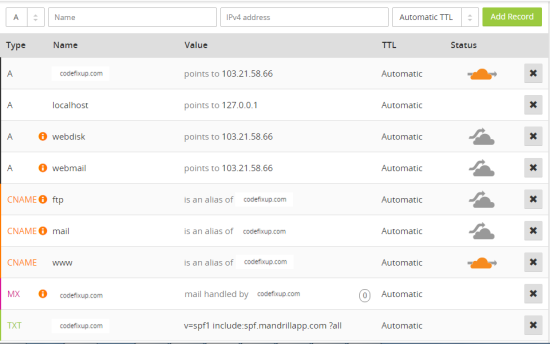
4) Orange cloud color shows that server request to website goes on CDN and gray color indicate that all request made by original server.
5) After that choose your subscription plan. For new website Free Plan is recommended.
6) Now you get two new Nameserver. Copy those and update it with existing domain name-server.
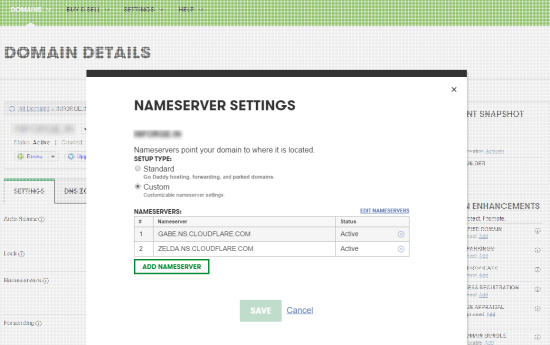
It will take maximum 24 hours to update the nameserver completely. Now your website is successfully integrated with CloudFlare CDN network. Share this post with others. Thanks
