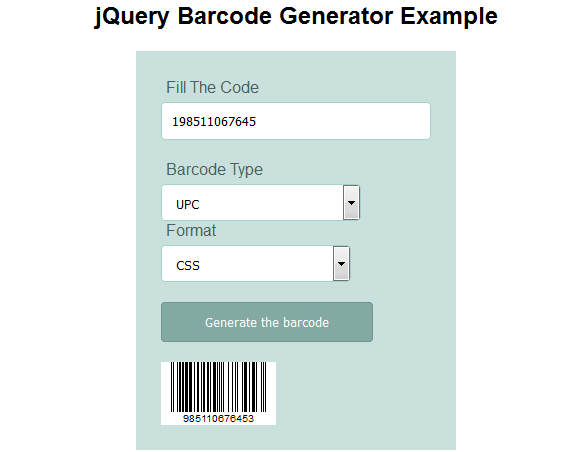
This post explaining the simple jQuery barcode generator HTML example. Barcode is an optical, machine-readable code which used to represent the data. Using barcode fast-selling items is quickly identified also preventing inventory build-up.
Generally, barcode used to save items information like price, code and name, etc. Shipping or Inventory manage projects commonly used barcode functionality. So, let’s start to learn how to implement a simple HTML Barcode generator.
We are using a very lightweight jQuery library to generate a barcode. Using this we can generate 8 different types of Barcode and output in various formats.
Supported Barcode Types:
EAN 8, EAN 13, UPC, standard 2 of 5 (industrial), interleaved 2 of 5, code 11, code 39, code 93, code 128, codabar, MSI, Data Matrix
Output format:
CSS, BMP (not usable in IE), SVG (not usable in IE), Canvas (not usable in IE)
Steps to Create a jQuery Barcode Generator:
We are showing a live demo to implement barcode generator using jQuery. File structure is like below:
- index.html
- jquery-barcode.js
- jquery-barcode.min.js
Step 1: Create an Input Barcode Generator HTML Form
First, create a jQuery submit barcode generator HTML form to fill the code and select barcode type and output format.
index.html
|
1 2 3 4 5 6 7 8 9 10 11 12 13 14 15 16 17 18 19 20 21 22 23 24 25 26 27 28 29 30 31 32 33 34 35 36 37 38 39 40 41 42 43 44 45 46 47 48 49 50 51 |
<body> <div align="center"> <h2>jQuery Barcode Generator Example</h2> <div class="frmContact"> <div class="field-row"> <label>Fill The Code</label> <span class="info"></span> <br /> <input type="text" id="barcodeValue" value="19851106" class="input_box"> </div> <div class="field-row"> <div class="contact-row column-right"> <label>Barcode Type</label> <span class="info"></span> <br /> <select name="btype" class="select_box"> <option value="ean8">EAN 8</option> <option value="ean13">EAN 13</option> <option value="upc">UPC</option> <option value="std25">standard 2 of 5 (industrial)</option> <option value="int25">interleaved 2 of 5</option> <option value="code11">code 11</option> <option value="code39">Code 39</option> <option value="code93">code 93</option> <option value="code93">code 93</option> <option value="code128">code 128</option> <option value="codabar">codabar</option> <option value="msi">MSI</option> <option value="datamatrix">Data Matrix</option> </select> </div> <div class="contact-row cvv-box"> <label>Format</label> <span class="info"></span><br /> <select name="renderer" class="select_box"> <option value="css">CSS</option> <option value="bmp">BMP (not usable in IE)</option> <option value="svg">SVG (not usable in IE)</option> <option value="canvas">Canvas (not usable in IE)</option> </select> </div> </div> <div> <input type="button" onclick="generateBarcode();" value="Generate the barcode" class="btnAction"> </div> </div> </div> </body> |
Step 2: Include the latest jQuery library Files
Add the latest version jQuery library, jQuery Barcode library ‘jquery-barcode.js’ and ‘jquery-barcode.min.js’ in index.html document.
|
1 2 3 |
<script src="https://ajax.googleapis.com/ajax/libs/jquery/3.2.1/jquery.min.js"></script> <script type="text/javascript" src="jquery-barcode.js"></script> <script type="text/javascript" src="jquery-barcode.min.js"></script> |
Step 3: Create a Container to Show Barcode
Now create a div container to show generated barcode in index.html document. We are using two container one is ‘barcodeTarget’ to show barcode and another one is ‘canvasTarget’ to show output format in canvas type.
|
1 2 |
<div id="barcodeTarget" class="barcodeTarget"></div> <canvas id="canvasTarget" width="150" height="150"></canvas> |
Step 4: Script to implement jQuery Barcode Generator
This step belongs to write down a jQuery code to generate a barcode using library function. On form submit ‘generateBarcode’ function is called to create a barcode. Check the below script code example:
|
1 2 3 4 5 6 7 8 9 10 11 12 13 14 15 16 17 18 19 20 21 22 23 24 25 26 27 28 29 30 31 32 33 34 35 36 37 38 39 40 41 42 43 44 45 46 47 48 49 50 51 52 53 54 55 56 57 58 59 60 61 62 |
<script type="text/javascript"> function generateBarcode(){ var value = $("#barcodeValue").val(); var btype = $('select[name="btype"]').val(); var renderer = $('select[name="renderer"]').val(); var settings = { output:renderer, bgColor: '#FFFFFF', color: '#000000', barWidth: '1', barHeight: '50', moduleSize: '5', posX: '10', posY: '20', addQuietZone: '1' }; if (renderer == 'canvas'){ clearCanvas(); $("#barcodeTarget").hide(); $("#canvasTarget").show().barcode(value, btype, settings); } else { $("#canvasTarget").hide(); $("#barcodeTarget").html("").show().barcode(value, btype, settings); } } function showConfig1D(){ $('.config .barcode1D').show(); $('.config .barcode2D').hide(); } function showConfig2D(){ $('.config .barcode1D').hide(); $('.config .barcode2D').show(); } function clearCanvas(){ var canvas = $('#canvasTarget').get(0); var ctx = canvas.getContext('2d'); ctx.lineWidth = 1; ctx.lineCap = 'butt'; ctx.fillStyle = '#FFFFFF'; ctx.strokeStyle = '#000000'; ctx.clearRect (0, 0, canvas.width, canvas.height); ctx.strokeRect (0, 0, canvas.width, canvas.height); } $(function(){ $('input[name=btype]').click(function(){ if ($(this).attr('id') == 'datamatrix') showConfig2D(); else showConfig1D(); }); $('input[name=renderer]').click(function(){ if ($(this).attr('id') == 'canvas') $('#miscCanvas').show(); else $('#miscCanvas').hide(); }); generateBarcode(); }); </script> |
In the above script code, we are using the ‘settings’ variable for the layout of Barcode. You can replace this value as per your need or make it dynamic using a form elements.
Using this library you can easily create a simple jQuery Barcode Generator HTML form. Just follow these steps. View the live demo below also available free source code to download. Thanks, Enjoy…


This is great.
I am searching information how I can incorporate this into my plan of developing an Inventory App using the Lianja App Builder.