If you are looking for Razorpay payment gateway checkout integration in PHP, then this tutorial is exactly for you.

In this post we explained the quick razorpay checkout integration process with live demo.
You can accept payments from your website and app, by integrating with the Razorpay Payment Gateway. Lets check it quick process:
Razorpay Payment Gateway Integration Steps
- Get Razorpay Key Id
- Create a Product Payment Form
- Write Ajax process and Payment Authorization API code
- Create a Success page
Step 1: Get Razorpay Key Id:-
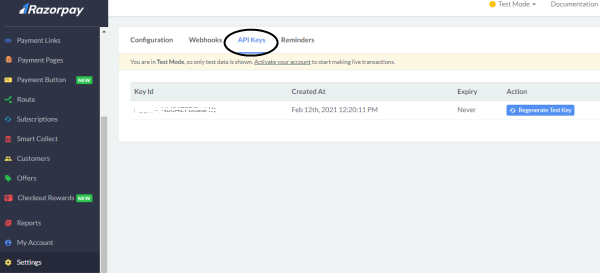
First, you need generate the Razorpay Key ID. For this click on ‘Setting’ left menu option, in API Keys tab, click to generate key Id and secret key.

You can directly API keys page via this link : https://dashboard.razorpay.com/app/keys
Step 2: Create a Product Payment Form:-
In this step, we need a payment form page, where we need to integrate Razorpay payment gateway.
We have created an index.php file for product payment form. In this an HTML form is created.
|
1 2 3 4 5 6 7 8 9 10 11 12 13 14 15 16 17 18 19 20 21 22 23 24 25 26 27 28 29 30 31 32 33 34 35 36 37 38 39 40 41 42 |
<!DOCTYPE html> <html> <head> <meta charset="utf-8"> <meta name="viewport" content="width=device-width, initial-scale=1"> <title>RazorPay Payment Integration Demo</title> <link rel="stylesheet" href="./css/style.css" media="screen" title="no title" charset="utf-8"> <script src="https://ajax.googleapis.com/ajax/libs/jquery/3.1.1/jquery.min.js"></script> <meta name="robots" content="noindex,follow" /> </head> <body> <div class="shopping-cart"> <!-- Title --> <div class="title"> RazorPay Payment Integration Demo </div> <form method="POST"> <input type="hidden" name="productId" id="productId" value="PRO121"> <!-- Product #1 --> <div class="item"> <div class="image"> <img src="dummy.jpg" alt="" /> </div> <div class="description"> <span>Common Projects</span> <span>This is dummy product</span> </div> <div class="total-price"> <input style="border: none;font-size: 20px;" type="text" name="price" id="price" value="100" class="rupee" readonly> </div> <button id="payButton" class="btnAction">Buy Now</button> </div> </form> </div> </body> </html> |
Now add the below script code in index.php file, this code will perform an action on the form submit button click. This is the Razorpay checkout js code which populates the payment popup form.
|
1 2 3 4 5 6 7 8 9 10 11 12 13 14 15 16 17 18 19 20 21 22 23 24 25 26 27 28 29 30 31 32 33 34 35 36 37 38 39 40 41 42 43 44 45 46 47 48 |
<script src="https://checkout.razorpay.com/v1/checkout.js"></script> <script> $(document).ready(function() { $("#payButton").click(function(e) { var getAmount = $("#price").val(); var product_id = $("#productId").val(); var totalAmount = getAmount * 100; var options = { "key": "rzp_************HJt", // your Razorpay Key Id "amount": totalAmount, "name": "Product Name", "description": "Dummy Product", "image": "https://www.codefixup.com/wp-content/uploads/2016/03/logo.png", "handler": function (response){ $.ajax({ url: 'ajax-payment.php', type: 'post', dataType: 'json', data: { razorpay_payment_id: response.razorpay_payment_id , totalAmount : totalAmount ,product_id : product_id ,useremail : useremail, }, success: function (data) { //alert(data.msg); window.location.href = 'success.php/?productCode='+ data.productCode +'&payId='+ data.paymentID +'&userEmail='+ data.userEmail +''; } }); }, "theme": { "color": "#528FF0" } }; var rzp1 = new Razorpay(options); rzp1.open(); e.preventDefault(); }); }); </script> |
Step 3: Write Ajax process and Razorpay Payment Authorization API code:-
In this step, we have created ‘ajax-payment.php’ code file to handle ajax post request.
Here, you can do database insertion part and checking that payment is authrized or not with the help of Razorpay API call.
|
1 2 3 4 5 6 7 8 9 10 11 12 13 14 15 16 17 18 19 20 21 22 23 24 25 26 27 28 29 30 |
$data = [ 'payment_id' => $_POST['razorpay_payment_id'], 'amount' => $_POST['totalAmount'], 'product_id' => $_POST['product_id'], ]; //check payment is authrized or not via API call $razorPayId = $_POST['razorpay_payment_id']; $ch = curl_init('https://api.razorpay.com/v1/payments/'.$razorPayId.''); curl_setopt($ch, CURLOPT_CUSTOMREQUEST, 'GET'); curl_setopt($ch, CURLOPT_USERPWD, "rzp_***********Jt:WD8l*********Sd"); // Input your Razorpay Key Id and Secret Id here curl_setopt($ch, CURLOPT_RETURNTRANSFER, true); $response = json_decode(curl_exec($ch)); $response->status; // authorized // you can write your database insert code here // check that payment is authorized by razorpay or not if($response->status == 'authorized') { $respval = array('msg' => 'Payment successfully credited', 'status' => true, 'productCode' => $_POST['product_id'], 'paymentID' => $_POST['razorpay_payment_id'], 'userEmail' => $_POST['useremail']); echo json_encode($respval); } |
Step 4: Create Success Page:-
After a successful payment process, the user will redirect to a success page. In the above index.php file, after getting the success response back, we have to redirect the user to the success.php page.
Use below success.php file code
|
1 2 3 4 5 6 7 8 9 10 11 12 13 14 15 16 17 |
<!DOCTYPE html> <html> <head> <title>Thank You - Codefixup.com</title> </head> <body> <div align="center"> <h4>Thank you for payment<br></h4> <br> <p><a target="_blank" href="https://www.codefixup.com"> Codefixup.com </a></p> </div> </body> </html> |
That’s it. Using these steps you can easily integrate Razorpay payment gateway on your web application.
